Assignment, Week 11: Perspective in Portraits
Theme of the week: "Eyes" and/or "Close-up"
Angle of view and vantage point are two of the most important aspects of a photograph. In fact, one could say these two things define every photograph in existence - what you're seeing and where you're seeing it from.Angle of view is an attribute that defines how much of a given scene that you see. A wider angle of view means you see more, and a narrower angle of view means you see less. Here's an example of a scene, and how the angle of view defines how much of the scene you see:
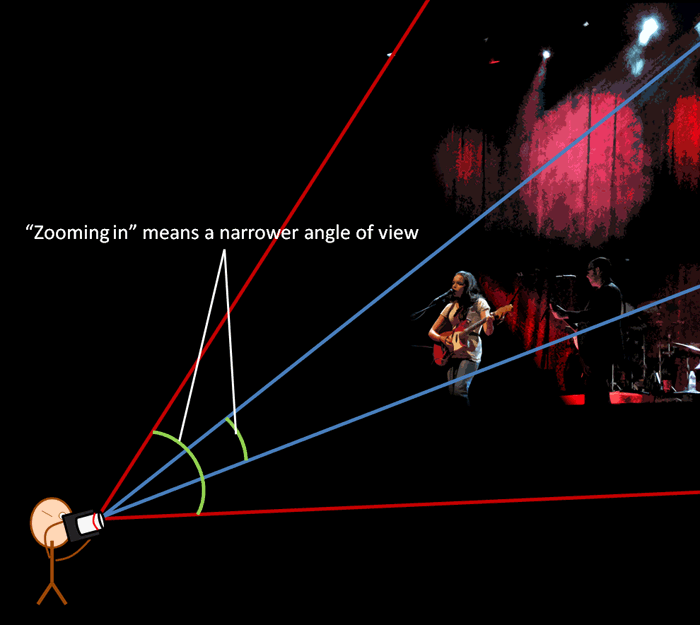
Here is the wide-angle image (the view denoted by the red lines), and the narrow-angle image (view denoted by blue lines)
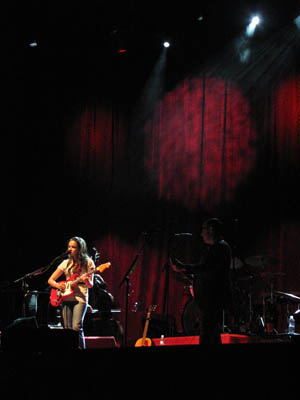
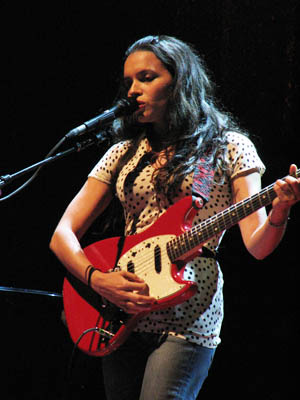
As we can see here, a narrow angle of view causes us to see less of the scene - here we see only the performer, where in the wide angle photo we could see the performer and the entire stage surrounding her. Another result is that the part of the scene we *do* see in the narrow angle photo - the performer - is magnified much larger. You're probably more familiar with the term "zoom" or perhaps "focal length". This is essentially what "zooming in" or using a "longer focal length" is doing - narrowing the angle of view, seeing less of the scene, and as a result magnifying the scene that you do see, and vice versa for having a wider angle by zooming out or using a shorter focal length.
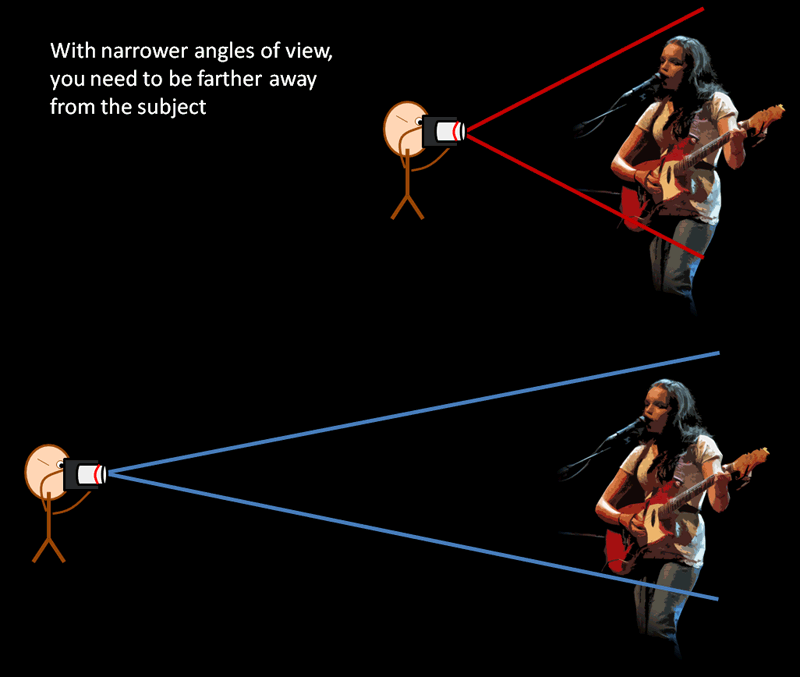
The angle of view you choose is going to force you to do certain things with regards to framing. Say you're taking a photo of a person. If you used a wide angle of view ("zoomed out", "short focal length"), you could stand right next to them and take their picture. If you were using a narrow angle of view ("zoomed in", "long focal length"), you would have to stand much farther away. This introduces another variable into the equation: subject distance, which is going to affect perspective.
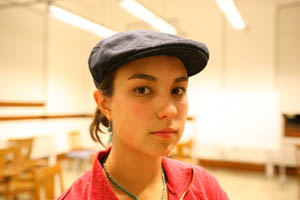
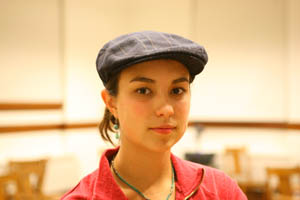
Here's a real-world example. The first image is using a wide angle of view, very close to the subject (Kate). The second is using a medium angle of view, at a medium distance from the subject. The last is a narrow angle of view, at a long distance from the subject. Note that the size of the subject is staying constant throughout the photos: I'm "zooming in" but stepping farther back at the same time.
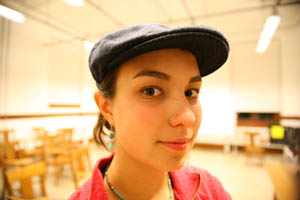
There are a few important differences to note.
- Distortion: In the narrow-angle, long distance photo, all of Kate's features are in correct proportion to one another - her left eye is the same size as her right eye, her nose, chin, and other features all agree, size-wise. If you take a look at the wide-angle, close distance photo, you'll notice that there's a lot of distortion everywhere. Her right eye is bigger than her left eye, her right cheek and the tip of her nose sort of jut out - they're much larger in proportion to her other features, compared to the "correct" proportion in the narrow angle photo. What we're seeing here is a change in perspective: the closer you are to the subject, the more distorted things become - you'll notice that the features of the face that are closer to the camera (right eye, right cheek, nose) are larger than the features that are farther away, such as the left cheek, or left eye. When you're very far from the subject, however, these differences go away - everything is in about equal proportion for the photo that is far away.
- "Depth" of Image: Related to distortion is the "depth" of the image. At long distance, the subject, while in good proportion, looks very "flat". Stare at the image - can you imagine if it wasn't a picture of a real person, but was instead a life-size cardboard cutout version of Kate instead? At close distance, however, the distortion makes the depth very apparent - you can tell exactly what is closer to you and what's farther away, and the photograph has a "3D feel" to it.
- Background: Another difference is the viewable background. In all three photos we maintain the same size of the subject, but the background doesn't remain constant at all. With a wide angle of view, we end up capturing much more of the background, and with a narrow angle of view we capture very little of the background.

This is a very important consideration to make when you take any portrait - do you want the portrait to focus on just the person themself? If this is the case, using a narrow angle of view will usually leave the background very "clean". on the other side, if you want to include the background to give better context, a wide angle may be a better choice, since it leaves in more of the background.
This week's assignment is all about experimenting with different perspectives and vantage points. When most people use their cameras, they just leave it "zoomed out", and get as close as they need to when taking a picture. However, the "zoom" feature on your camera can do a lot more than just zoom in when things are far away - using your camera zoomed in at a narrow angle of view can force you into different subject distances and perspectives than you normally would.
You have two options for this week's assignment. Option A is to do a portrait session - find a friend or family member, and experiment with portraits using different angles and subject distances to get different perspectives. Another thing you might want to try is to use different vantage points - get lower or higher, or shoot from the side, etc. The goal here is to get as very diverse array of photos, with different perspectives and angles, all of the same subject. Option B is to spend an entire day taking photos zoomed in to your camera's maximum zoom (the narrowest angle of view). Most of the time people take pictures at the widest angle of view - the purpose of this excercise is to explore photographs taken at the narrow angle of view, and what kind of changes in perspectives, or vantage points, you get when shooting exclusively at this end of the zoom range on your camera.
Assignment Summary:
- You have two choices for this week's assignment:
- Find someone to do a portrait session with. Experiment with different angle of view (zoom in and out), perspective (move closer or farther from your subject), and vantage point (try different angles instead of the ordinary head-on photo). Submit as many photos as you'd like, and try to include a wide variety illustrating the differences that occured when you chose specific angles, perspectives, or vantage points.
- Spend an entire day shooting at the narrow angle end of your lens ("zoomed in" all the way).
- You will have two weeks (yay!) to do assignment, since we won't have class next week because of Thanksgiving Break.
Resources:
- A really neat program you might want to check out is ExposurePlot. It's a freeware program that scans through all of your images and searches for data on things like focal length, shutter speed, ISO sensitivity, and aperture and compiles them into a plot (you can find all this information on an individual photo by right-clicking and going to "Properties"). It's a really interesting tool for analyzing large batches of photos, for example, seeing what focal lengths you used on your last vacation:
London Trip: Plot of focal lengths used over 458 photos
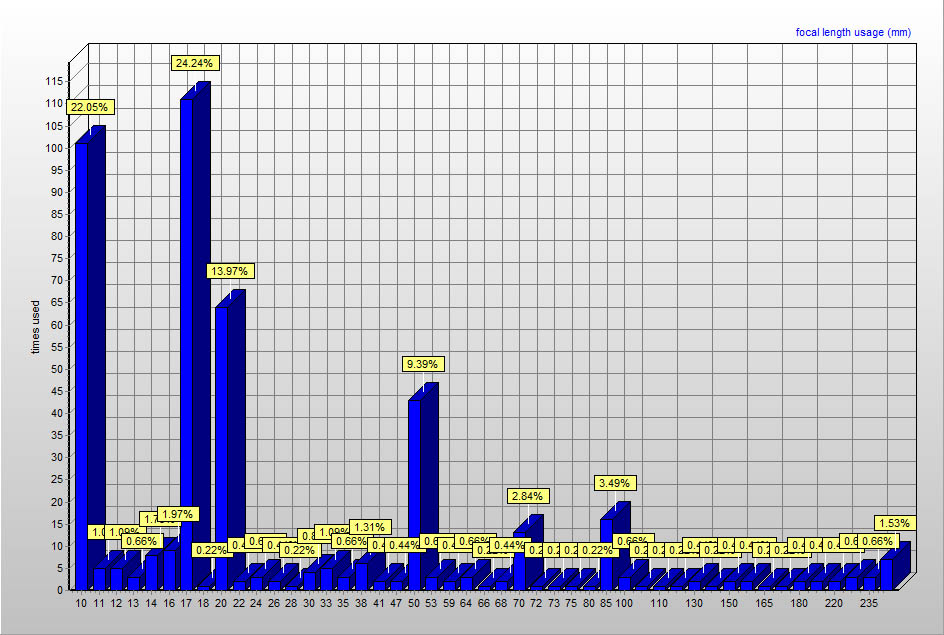
From this graph, you can see I tended a lot towards use short focal lengths (wide angle of view) - 10mm was used 22% of the time, 17mm was used 24% of the time, and 20mm was used 14% of the time! You can see that I rarely ever used the longer focal lengths (narrow angle of view), however.
If you're interested, download the program, point it towards a folder of photos, and generate a plot of your focal lengths.